


We have all been there; you are trying to install a new program or copy a file onto your computer and your computer informs you that you do not have enough space or the hard drive icon on your PC is red, it is now time to free space on your computer. You are then compelled to delete your favorite movies or pictures just to create space.
With the introduction of the SSDs (solid-state drives) with less than idle drive capacities compared to the traditional mechanical hard drives (HDD), this issue has become more prevalent.
1) In this How-To article, we will discuss 5 ways to free space on your Windows PC hard drive. Some of these techniques are widely known while others might not be common knowledge.

2) Before you go ahead to delete your favorite movies and TV shows you might want to consider these 5 steps to clean your Windows PC hard drive.
Empty the Recycle Bin
The first and most obvious thing to do is empty your Recycle Bin when you delete files sized less than 4 GB, Windows automatically stores them in the Recycle Bin. Emptying the Recycle Bin relieves your computer of valuable space that was taken up by unwanted files, to do this follow these steps:
- Right-click on the Recycle Bin icon on the desktop to open the drop-down menu.
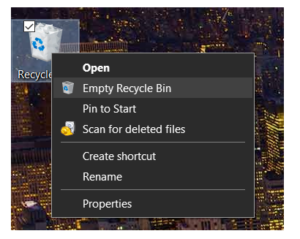
2. Click the highlighted “Empty Recycle Bin” from the drop-down menu.
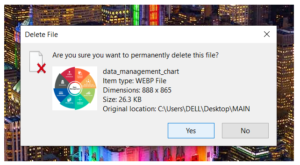
3. Click the “Yes” button to perform the function.
Disk Cleanup
There is a built-in disk cleanup utility in Windows, conveniently named Disk Cleanup, that can be used to keep your computer’s storage in check by removing files that are difficult to locate in Windows.
Disk Cleanup is used to clean files that are hidden from normal view, it allows the deletion of files such as temporary files, Downloaded Program Files, etc. These files when not deleted regularly can amount to gigabytes of data over time.
Also, Disk Cleanup can be used to clean system files that can occupy large disk space especially after upgrading Windows (NB These Windows files allow for the user to roll back the update to the previous version of the operating system in case there are bugs in the updated version. Users should ensure that they are comfortable with the update before deleting the Previous Version of Windows files).
To access the Disk Cleanup function:
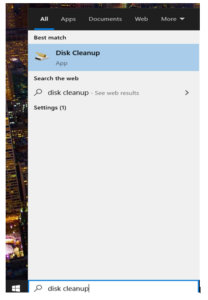
- Type in the Windows search bar (disk cleanup) and click the top result to open the utility. (Alternatively, you open Disk Cleanup by right-clicking the “Drive (C:)” found in “This PC” and select “Properties”. With “Properties” Window open click on the “Disk Cleanup” button to open.)
2. Select the types of files you want to delete by clicking in the checkboxes (Do not check the “Thumbnails” box as this will delete all your thumbnails of your files.)
You can go a set further by deleting system files, that do not appear in the list here.
Click the “Clean up system files” button, additional files will appear and you can check the boxes beside them to include them.
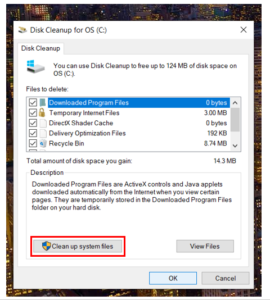
- After selecting the files, you want to delete click the “OK” button to remove files and free valuable space.
Uninstall Programs
There are instances where we have programs or apps on the PC that we no longer have use for. These programs if not deleted occupy space on the computer. Another instance is bloatware i.e. software that comes preinstalled on your new computer from the manufacturer that you might not need. In both cases, you can free space by uninstalling unwanted programs that are on the computer.
Follow the steps below to uninstall/ remove unwanted programs:
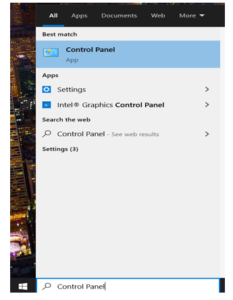
- Type in the Windows search bar “Control Panel” and click on the top result to open.
2. In the Control Panel window click on the drop-down menu beside “View by:” and select “Category” and click “Uninstall a program” under “Programs”.
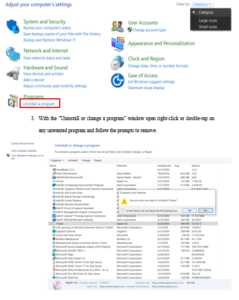
3. With the “Uninstall or change a program” window open right-click or double-tap on any unwanted program and follow the prompts to remove.
Turn on Storage Sense
Storage Sense is a new feature in Windows 10 that can be used to automate some of the disk cleanup activity. Storage Sense can be set to automatically clear the recycle bin, delete temporary files that apps are not using and clear the Downloads folder.
To setup Storage Sense follow the steps below;
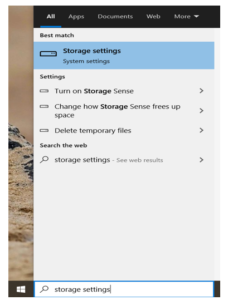
- Type in the Windows search bar “Storage Settings” or “Turn on Storage Sense” and click on the uppermost result to open.
2. Once the “Storage” window is opened, click the “Configure Storage Sense or run it now” option.
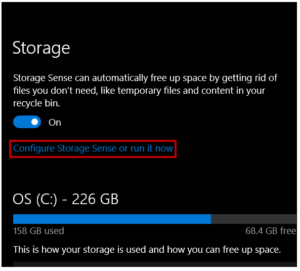
3. Turn on Storage Sense in the “Configure Storage Sense or run it now” window.
4. Under the “Temporary Files” section check the “Delete temporary files that my apps aren’t using” option and select the duration you want files stored in the Recycle Bin and Downloads folder (NB choose never for the duration under Downloads folder if you do not want Windows to automatically delete your downloaded files)
Spacesniffer
To free space on your computer many people start by deleting large files they no longer need, sometimes, doing that still does not cut it. You realize a large portion of your hard drive is still full, unfortunately, Windows does not provide an easy layout to identify what other files are taking up space. That is when this nifty little freeware aptly called Spacesniffer comes to your rescue. Spacesniffer is a small application that lets you understand how folders are structured on your hard drive, in other words, Spacesniffer gives you a visualized layout of all files on your hard drive. This visualized layout gives the user a clear view of where big folders and files are placed on their computer.
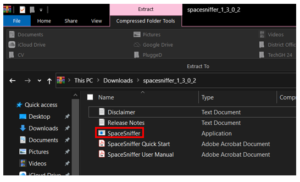
- Google and download the Spacesniffer software.
- Unzip/extract the zipped downloaded folder and run the Spacesniffer executable file.
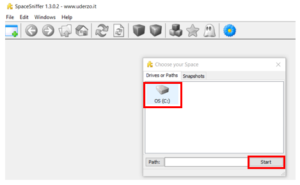
3. Select the hard drive you want to explore and click Start to begin the scan process.
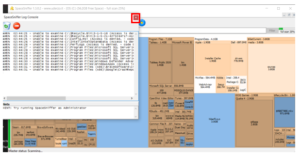
4. Give the software some time to explore your selected hard drive and provide a detailed Treemap visualization of the files and folders on your computer (NB close the Spacesniffer Log Console when the Treemap visualization is complete)
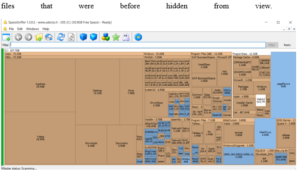
5. The bigger squares or rectangles in the Treemap represent large folders and files on your hard drive. If you need more detail on a big folder, just click on it and the selected element will be detailed with its content. You can use this to identify and locate large files that were before hidden from view.


